Graphically creating composite logs in the Well View
There are occasions where log data can be limited, for example when it was only acquired for the main zones of interest (e.g., reservoir/production zones), or noisy due to issues during data acquisition. However, to perform calculations in the various workflows, it is required to have log measurements over the entire wellbore.
You can use the Create Composite Log tool  (Workspace > Tools > Editing Tools, or Shift + F1) to compose a new log by taking an entire interval from another log or pieces from several different logs of the same log type. This way, you can borrow missing data from other available logs, replace noisy parts in your log or add trend line information and log data acquired at a later stage.
You compose a new log graphically in the compositor track of the Well View. The compositor is a type of track designed to aid in log composition. You first need to add a compositor track using the Template Editor in order to start composing.
Once a compositor track is added, you can select the desired log type and the logs that will serve as input to your new composite log. You can also choose to display any associated trend line in order to use it as an input. The compositor track will display the selected logs/trend lines in the Well View.
You can then start creating the composite log with the Create Composite Log tool. You can choose to take an entire log or trend line as input to the composite log, or stitch together pieces from multiple raw logs and/or trend lines. The new log is created in a new track, called composite track.
Adding a compositor track
- Open the Well View (Workspace > Views > Well View or Alt+F6).
- Display the well(s) for which you want to create a composite log by selecting the checkbox in the JewelExplorer.
- Open the Template Editor, by clicking the Template Editor icon
 in the Well View toolbar.
 - In the Template Editor, add a new track, using one of the options listed below:
- Click the + Track tab above the Track Explorer.
- Right-click the name of the template in the Track Explorer and click Add track.
- (Optional) Select the new track in the Track Explorer and under the Track Settings change the track name. This name is only displayed in the Track Explorer.
- Right-click the new track in the Track Explorer, and select Add compositor.
Once you have added a compositor track in the Track Explorer, you can continue with specifying the required settings in the Template Editor (see next section, Selecting input log(s) for the composite log).
Selecting input log(s) for the composite log
The input to composite logs can be logs and/or trend lines. In the Compositor Settings section you specify the log type for which you want to create a composite log, the input logs and you can choose whether you want to also use a trend line as input or not. In the Scale Settings you can adjust the settings for the compositor track.
- In the Track Explorer of the Template Editor, select Compositor under the new track to visualize the settings pane.
- In the Compositor Settings section, select the log type for which you want to create a composite log from the Log type drop-down list. Once a log type is selected, it stops being available for selection in a newly added compositor track. This means that you can have only one compositor per log type.
- (Optional) You can change the name of the compositor track by typing a new name in the Display name text field.
- When you select a log type at the top of the form, the Logs table is populated with all the logs of the selected log type that are present in your solution. Select the log you want to use as input and click on the blue arrow (
 ) to move it to the Input logs table. You can move one log at a time.
 - The Input logs table lists the logs that will be displayed in the compositor track and can be used as input to create the composite log.
- (Optional) In the Color section of the Input logs table, you can change the display color of an input log by clicking the drop-down icon and selecting a different color from the color palette. Note that this change only applies to the compositor track and it does not change the color of the log in the rest of the application.
- (Optional) In the Trendlines section, click On to display any trend line available for the selected log type in the compositor track. This way, you can select it later as input to your composite log with the Create Composite Log tool.
- Click Apply to display the input logs in the compositor track(s) of the well(s) you selected to show in your Well View and keep the form open. You can then adjust the Scale Settings of the compositor track. Otherwise, you can click OK to display the input logs, close the form and start composing the new log.
Use the toolbar options to change the display order of your input logs in the compositor track or to remove a log.
|
|
Move the selected log one step up in the Input logs table. |
|
|
Move the selected log one step down in the Input logs table. |

|
Remove the selected log from the Input logs table. |
Graphically creating composite logs using the Create Composite Log tool
You can graphically create a composite log using the Create Composite Log tool (Workspace > Tools > Editing Tools, or Shift + F1) from the Well Tools of the floating palette.
With this tool, you can select entire logs or intervals from several logs which you can then stitch together to create one composite log. You can also add entire trend lines or parts of them. To graphically compose a new log (or trend line) in the Well View:
- Open the Editing Tools (Tools > Editing Tools in Workspace, or Shift+F1).
- Select the Create Composite Log toolin the Well Tools section of the floating palette.
- Click and drag in the compositor track to select a depth interval. The interval is highlighted in blue.
- Click on the curve of the log that you want to select. The log is highlighted in red to indicate your selection.
- Double click on the highlighted log to create the composite log in a new composite track. The new log will appear in the JewelExplorer, under the relevant log type in the All Logs [depth] folder and under the Logs folder (Well Data > Wells) of the well for which you created the composite log.
To select an entire log, continue with step 4. To select a depth interval continue with step 3.
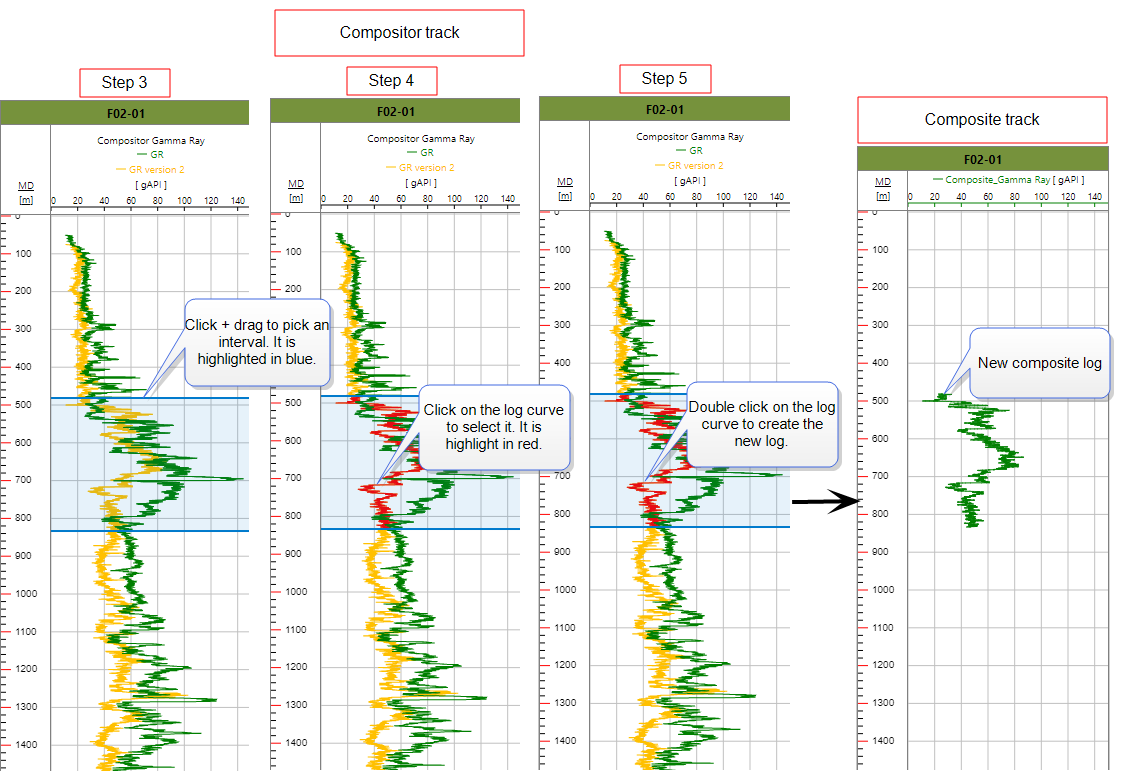
Example on how to compose a gamma ray log using the Create Composite Log tool. click to enlarge
When using the tool, you can also:
- Re-size the selection area (highlighted in blue) by dragging your cursor up or down.
- Replace an existing curve or trend line with a new selection.
The Settings section of the tool allows you to switch between log types that have a compositor track, create new composite logs and give them new names, or edit existing composite curves.
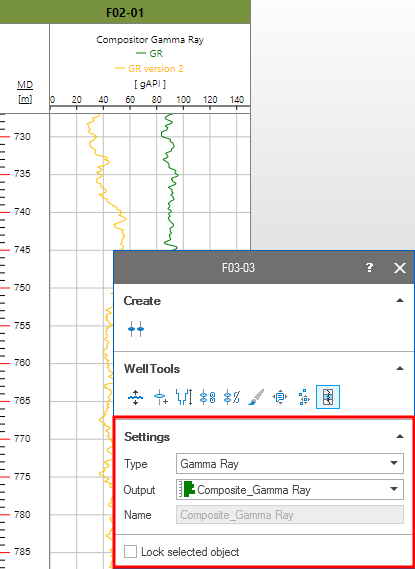
The Settings section of the Create Composite Log tool. click to enlarge
Type Select a log type for which you can create a new composite log or edit an existing one from the drop-down list. The list only shows types that have compositor tracks available in the active Well View.
Output Choose whether you want to create a new composite log or edit an existing one.
- Select '+New' from the drop-down list to compose a new log. When you create a new composite log, it appears automatically under the relevant log type in the All Logs [depth] folder (Well Data > Wells) in the JewelExplorer.
- Select an existing composite log from the drop-down list in order to edit it.
Name (active when you create a new composite log) Change the name of the composite log by typing a new name in the text field.
Lock selected object Check this option to ensure that the tool does not change when you click an object of a different type, so you can continue to work on the object you selected.